Showing posts with label recipes. Show all posts

Monday, September 27, 2010

Sourdough!

Growing up in California I developed a taste for the wonder that is sourdough bread, my favorites being the ones from San Francisco and San Luis Obispo. There's nothing better than a chunk of sourdough bread and pepperjack cheese or a sandwich made with the fragrant and tasty bread.

Sourdough bread is one of the "foods" I miss most living here in the Balkans. Last year while I was in Wyoming I found an "Oregon trail" comic cookbook that had a simple starter recipe for sourdough. Upon my return to the Balkans I eagerly set about preparing the starter... but then it got this funky, smelly liquid on top and I thought I'd ruined it. So I threw it all away and started over. This time there was no funky liquid, but then the dough never rose either... I mean, I waited a whole two hours. So I threw that one away too.

I must interject an important factoid at this point: I have NEVER made bread on my own before. I've tried, but always failed. So my dreams of sourdough, while a simple thing to some, was overly ambitious for me. And the above experiences seemed to prove it.

But then a few weeks back after a mildly successful try at a simple bagel recipe (the dough actually rose!!) I decided to try my hand again at my favorite of the breads: sourdough. Instead of using the old west cookbook I decided to "Google" (don't you just love how that's a verb now??) "sourdough starter" on the internet. And this is the site I found: Sourdough Baking by S. John Ross.

He made it sound so easy, growing a "pet" of sourdough starter, so I gained a little confidence. A cup of flour and a cup of water and daily "feeding" for a week resulted in a starter that was bubbly and smelled pretty good. So into the fridge it went and now just weekly "feedings." Then on Saturday I decided that it was time. So I dumped the starter in a bowl and prepared the "sponge" for "proofing." And then I went to bed.

In the morning there were no bubbles and no "froth." Did I ruin it?? "I have such bad luck with breads," I muttered in disappointment and decided to "feed" it just once more before heading to church. Five hours later I arrived home to find my sponge was smelly and frothy like it was supposed to be! Yeah me! So in went the flour and other ingredients and then the kneading... and kneading... and kneading... And then back into the bowl to rise. It took about 6 HOURS to double in bulk, but after beating it down and forming mini loaves they rose a second time in just an hour.

I couldn't believe it! Could I be "this" close to having actual sourdough bread?? Well, after 45 minutes in the oven I got to savor warm bread with melted butter... and it was wonderful! It wasn't perfect and the loaf looks a little odd, but I think it's cute and I'm so proud. ;)

And I can't wait to try making it again... and again... and again... =)

Wednesday, December 3, 2008

Recipe: Pumpkin Pie in the Balkans


Making a pumpkin pie was an all-day process this year and at times I mused that it was SO "from scratch" that it included all but milking the cow myself! I roasted & mashed the pumpkin, used homemade extracts, ground my own nutmeg and used my Mom's favorite pastry recipe for the crust. The process began at 10AM and finished around 9PM (though to be fair I did make a berry pie too.) In the US, though, one can simply use canned pumpkin, pre-blended spices and Pillsbury ready-made pie crusts.... 2 hours tops from start to finish!

Now the confession... it being an all-day process was not really that big of a deal... because I've been making pumpkin pies from scratch for years as I've fine-tuned my personal recipe (one I've tweaked since I was 9 years old). :) Now, don't be shocked, but I'm finally going to cut loose with that recipe and share (though still keeping a couple secrets secret. ;) )

Ingredients:
2/3 cup firmly packed dark brown sugar
1/2 teaspoon salt
1/2 teaspoon ground cinnamon
1/2 teaspoon ground nutmeg
1/2 teaspoon ground ginger
1/4 teaspoon ground allspice
1/4 teaspoon ground cloves

The above five ingredients may be adjusted to increase or decrease spiciness of the pie. This year I used homemade spice extracts and found that the overall flavor was more fully blended due to their liquid form. [To make an extract: vodka+whole spice+several months=a really nice extract] Extracts can be substituted 1:1 with the ground ones.

1/2 teaspoon vanilla extract
3-4 tablespoons dark molasses (grape molasses in the Balkans)
1-1/2 cups, mashed cooked pumpkin
2 eggs, beaten
1-2/3 cup evaporated milk
1/3 cup cream

Mix all ingredients except pastry. Pour into pastry-lined pie pan. Bake in preheated extremely hot oven (500F) for 8 minutes. Reduce heat to 325F and bake for 55 to 60 minutes longer until knife inserted in center comes out clean. Makes 6-8 servings. Serve with whipped cream on top (simply a must).

Pumpkin: to make from scratch use an Australian blue pumpkin and/or a butternut squash (don't use the common orange pumpkin as it is basically flavorless). Cut up into large chunks (leaving peel on), cover and roast in oven at 325F until very soft. Scrape out meat from skin while still warm and then allow to cool for about 1/2 hour before blending well with a mixer or in a blender.

Basic Pie Pastry:
2 Cups flour
1/2 Teaspoon salt
3/4 Cup butter
6-7 Tablespoons ice water

Combine flour and salt then cut in butter and blend well with fork until texture is small and crumbly. Add the ice water a tablespoon at a time, blending with fork, until the whole mixture is moistened. Form into two balls and turn out on well-floured surface. Place in pan and trim edges to 1/2 inch from top of pie pan. After adding pie filling cover the crust edges with foil for half the total baking time.

Enjoy!

Tuesday, October 28, 2008

Recipe: Old World Apple Cake

I've always thought that October is the best month in which to have a birthday. The air is crisp but still carries hints of the summer gone by. The trees, parks and wooded paths are colored in various shades of greens, yellows, oranges and browns. Тhen there are the numerous seasonal items like squash, sweet potatoes and, of course, apples. And with apples comes the best game ever for a kid's birthday party: apple dunking (or bobbing)!

For those who aren't familiar with this, imagine a big barrel or ivar-making-tanger (танџер) filled with water and dozens of bright red harvest apples bobbing on the surface. Then the children hold their hands behind their back and try to pick up an apple with just their mouth. :::giggle:::


[Apple-dunking picture source:
http://www.borehamwoodtimes.co.uk/news/picturegalleries/apple_day/ ]

Unless there's a decent stem, the participants will end up dunking their entire heads all the way in to wedge an apple against the bottom and sink their teeth in. Coming up they send splashes of water onto everyone within a 5 foot radius. They are soaking wet from head to torso but with a triumphant apple-filled smile. Ahhh... memories. :) (My Macedonian friends are probably cringing at this moment at the image of children being outside with wet hair in October.)

Now a days I don't go dunking for apples anymore (though the kid in me would love to!) instead I bake. And that's just what I did this weekend with the big bag of organic apples that a friend gave to me on my birthday last week. It's an old family favorite of mine and a gem I thought worth sharing. It's from my Mom's well-worn and loved 1966 copy of the Woman's Day Encyclopedia of Cookery (Vol. 1, Fawcett Publications, Inc., New York, 1966, pg. 102).

Old World Apple Cake

Ingredients for Filling

3 Pounds cooking apples
1/3 cup sugar
1/2 cup water
2 slices of lemon

Ingredients for Pastry
2 Cups sifted all-purpose flour (sift before you measure)
1-1/3 cups sugar (about)
1-1/4 teaspoon baking powder
2/3 cup butter or margarine, softened
2 egg yolks (room temperature)

Method

Peel and slice apples. Cook with sugar, water and lemon until tender but not mushy. Drain and cool. Remove lemon slices.

Mix flour, 1-1/4 cups sugar and baking powder. Cut in 1/2 cup butter with pastry blender or work in with fingers until mixture is crumbly. Mix in egg yolks. Reserve 1 cup four mixtrue for top. Pat remainder on bottom and sides of greased 9-inch spring-form pan. Fill with apples; sprinkle with reserved topping; dot with 1 tablespoon sugar. Bake in preheated moderate oven (350F) for 1 hour. Serve warm or cold. Makes 6 to 8 servings.

OK, now for my Macedonian friends who have asked me for this recipe...сега ке пробам да ви го кажам рецептот на Македонски (благодарам на моите учителки кои што ме помогнаат со овој рецепт).

за полнење
3 кила јаболка за печење
1/3 шолја шеќер
1/2 шолја обична вода
2 парчиња лимон

Излупете ги и сечете ги јаболката. Ги варете сите парчиња со шеќерот и лимонот ċе додека не омекнат. Исушете ги и се изладете ги. Вадете ги парчињата од лимон.

процедно (за тесто)
2 шолји приближно брашно
1-1/3 шолји шеќер (околу)
1-1/4 мала лажица пециво (прашок за печиво)
2/3 чаша путер или маргарин (околу)
2 жолтчки (соба темпетура)

Загрејте ја рерната на 177°с.

Во среден сад го мешате брашното, 1-1/4 чаши од шеќерот и пецивото. Само 1/2 чаши од путерот го сечете заедно во смесата со вилушка. Додадете ги жолтчките во садот со смесата и мешајте дури не стане хомогена смеса. Ставете една чаша од смесата на страна и ставете го другиот во една тава. Ставете ги јаболките или овошјете од ваш избор и на крајот ставете ја смесата на врвот на обошјето. Сега, со голема лажица, ставете го шеќерот на врвот. Печете ја тортата на 177°с за еден саат.

Prijаtno јадење! And have an enjoyable and color-filled fall season! :)

Thursday, October 9, 2008

Recipe: Ljutenitsa or Pinjur... though not exactly ;)


Yesterday I gave a jar of Ajvar as a gift to a baba I know while describing Day-3 of our Ajvar-making weekend. I said we'd made another local specialty called Љутеница but she said that we didn't add hot (lute) peppers so it couldn't really be called lutenitsa. She suggested that it was more like Пинџур (pinjer) but since we didn't add tomatoes it wasn't exactly that either. Oh the dilema! So I teasingly suggest that we call it a combo of the two, something like, pinjenitsa (пинџеница). ;) No matter what name it goes by, the end product spread on bread with some creamy feta was delish!

From the 75 kilos of peppers we set aside about 15 that we cut up instead of ground. Same goes for a couple eggplant. Together with several cloves of garlic, fresh chopped parsley, 1 liter-ish oil, 1/4th-ish liter vinegar, and decent helpings of salt and sugar to taste made up our pinjenitsa.

Throw it all in a tanjer (голем танџер) and put on the stove over a roaring fire. Cook for about 2 hours stirring constantly with a big wooden spoon until broken down and flavor-filled but not completely smooshy like Ajvar. Or you can do what we did and ask a neighbor-lady if it was done yet. :)

Our batch yielded about 12 small jars of this delectible spread... there were a few more but we (7 of us) ate it for lunch while it was still warm. ;)

Monday, October 6, 2008

Ajvar: Community Pepper Peeling

Oui! How is it that every muscle in my body hurts?! It's amazing how sore you get while making Ajvar.... between hunching over and peeling, peeling, peeling and four-hours of stirring, stirring, stirring it's no wonder! Our second day making the local specialty went really well and was full of fun. Here's a picture diary of our day which began with:

Roasting peppers until they're black and easy to peel... this time with the stems on in order to do a comparison of methods used by locals... more to come on the verdict in another blog...
Beginning the pepper-peeling process....

Prepare shish-kabob's for lunch

Quickly move everything inside because the previously sunny day disappeared in a torrent of rain!... and peel more peppers

Roast eggplant (aka "black tomatoes")

Pause for lunch under the once-again clear skies.... the carrots and cherry tomatoes in the salad were fresh from the garden!

Continue to peel peppers and now eggplant (eggplant is by far the hardest to peel btw)...

Begin to grind the peppers and eggplant... don't you just love the innovation of using a drill vs. hand-cranking!?! Zip zip! It went so fast!


Continue peeling and grinding while beginning to stir the mix on the stove... adding 1 liter (!) of oil to start...


Chop fresh parsley from the garden and garlic for the ajvar beginning to boil on the stove..

Short break for early blackberry birthday pie for Pattie and myself [thank you!!].... while still peeling!

More peeling!

Finished the peeling and now finishing up the grinding!!

Now the brewing begins! We needed to cook this mixture until it's 1/2 this size!

That means... four HOURS of stirring... and stirring... and stirring..... Once the mixture had cooked down, thickened and darkened, we brought it all upstairs to begin spooning into freshly sanitized, prepared jars...

It's hard to believe that 75 kilos of peppers and 20 of eggplant boiled down to 20 small jars and 5 large jars of Ivar! (Or as my brother and nephews teasingly pronounced... Ajuh-bep... the Englishification of the Cyrillic for Aye-var... Ајвар)

If you're counting jars in this picture you'll notice there's only 4 large jars... that's because we ate one while it was warm! It's so yummy to slather warm Ivar on bread and top it with some sirinje (a creamy feta-type cheese). MmmmMmmm...

By far, the best thing about making Ajvar, though, are the hours of fellowship, laughs, conversation and community-building among participants enjoying each other, the work and the day. :) Besides making Ajvar with colleagues, I've twice had the priviledge of making Ajvar with a Macedonian family from church. I loved sitting at the stove with the dad and chatting while monitoring the peppers process and adding more when others were done... or the laughter and conversation that happened with everyone around the pepper-peeling on a crisp autumn day. Making ajvar is one of those very special community activities and something I look forward to now each year.

Though I could go another year before I peel another pepper! lol ;)

Monday, September 29, 2008

Recipe: Chili because it's CHILLY

Brrr. It's really cold these days in the Balkans, but nothing warms me up like some good 'ol chili... My dad actually perfected a recipe that started with a slab of steak cut into fine cubes and seasoned with his secret-blend. It would take all-day to prepare and simmer-to-full-flavor, but since that's a secret-family-recipe, and in the interest of time, I thought I'd share my basic throw-it-all-in-a-pot version that I enjoy making (and with a Macedonian-pepper twist). It's quick, easy and quite enjoyable.

Ingredients:

1 lb (1/2 kilo) ground beef
1 Large onion, diced
1 Med onion, diced
2 cloves garlic, minced
4 Large ripe tomatoes, diced
(or 2 tomatoes & 2 14oz cans stewed)
3 Green peppers, diced
2 Red peppers, diced
(a favored personal addition since living in the Balkans)
1 14oz cans kidney beans
1-1/2 T chili powder (adjust up or down for heat)**
1/2 tsp salt
(can add more, I just don't like to use a lot of salt)
1/2 tsp ground pepper blend
(preferably a fresh grind mix of green, black and white pepper)

Preparation:

Brown meat in skillet with diced medium onion, 1 minced garlic clove, 1 diced green pepper and sprinkling dash of salt.

While that's browning simply dump remaining ingredients (tomatoes first) into a large stew-pot and turn heat on low.

When meat is completely browned, drain excess fat and then combine with ingredients in pot. Cover and cook on med heat until boiling. Reduce heat and simmer for 1 hour.

Makes 8-10 servings.

Serve with fresh bread (pictured on a fun plate that my nephew made). It's also good served over rice (something I learned from my East Coast colleagues) or with homemade cornbread. And don't forget the side salad to round out the nutrition. :)


Personally, I like to store my chili in single-serving containers in the fridge for one night to cement the flavors. Then I place them in the freezer for quick and easy meals during the week. :)

Spaghetti Sauce: It's simple to turn this basic chili recipe into a Spaghetti sauce simply by excluding the kidney beans and substituting 1 T rosemary in place of the chili powder. I also enjoy adding a little chopped zucchini as well (in the US I'd add yellow squash too). Don't forget to sprinkle the finished product with parmesan cheese. :)

**Note to my Balkan friends: The chili powder that is referred to is not exactly like bukavetz or ljutenitsa (pictured up top), it's a blend that I got ready-made from the US (or has been sent in a care package). Anyways, I did find some recipe's online with instructions on how to make your own, which I will try as well... One from the Sacramento Bee (my hometown paper btw), another from the Food Network and finally one from Wikipedia. I know you can't get Ancho chili pods here, but the ljut piperki will work as a substitute (see pic on right). Prijetno jadenje!

If anyone else has a good recipe for making homemade chili powder, please share! :)

Monday, August 18, 2008

Recipe: Burek/Pita aka Balkan Pie

When preparing to come here to the Balkans I'd read about a local specialty known as "meat pie" that was typically served for breakfast. Meat pie?? It conjured images of a double-crust American-style pie with meat filling. Or I imagined that maybe it was rather like a chicken-pot pie. Ha! Was I surprised when I arrived here and saw this:

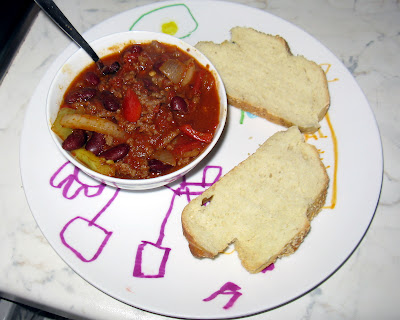
The version pictured above is made in a 1-1/2" deep, round, baking pan and was first introduced by a Turkish baker from Istanbul in Nis, Serbia, in 1498 (according to Wikepedia). In Macedonia, a version called "pita" (Пита or "pie") is prepared by layering ingredients in filo-dough, rolling into a pin-wheel and baked in the round pan. Burek* (Бурек) is pretty much the same as pita except that the layering is done directly into a 1-1/2" deep round pan with no rolling. Personally, I prefer the Pita version because it's a little less oily and breaks off into easy bite-sized pieces--though a Macedonian lady told me that if you make it yourself you can make any of them less oily. :)

Here's the basic recipe for pita:

Filo-Dough, about three sheets (give or take)
Filling (choose one from below)
Oil

Work quickly so that the dough does not dry out. Simply place a little oil and filling in between the layers and roll into a pin-wheel. (Or layer in baking pan for burek using a bit more filo dough and filling.) Heat at 482F (250C) for 20 minutes until golden brown.

The salty versions are served warm with a bottle of plain yogurt to drink.

Filling Options:
Quantity depends upon how much you want to make. :)

Meat: browned meat with onions and a little Vegeta (a use-in-every-dish-under-the-sun seasoning)

Spinach & Urda cheese
My best description for urda is that it's like a dryer cottage cheese (some places online give Ricotta cheese as an substitute). Here's a basic recipe: bring 1 liter of milk to a boil and then add 1 tsp lemon juice into 1/2 cup warm water and add to the boiling milk. Reduce heat and Stir constantly until curdles and whey are completely separated. The curdling should happen fairly quickly, but if it doesn't, increase heat and add more lemon juice. Strain mixture through cheese cloth (or tea towel) and rinse with running water for 1 minute. Squeeze out excess water. Voila! Homemade kinda-cottage cheese. Season with salt and mix with spinach for fill.

2-4 Eggs & Urda cheese
Beat eggs and mix together with the cheese. Personally, I'd probably add some onions as well... ok and maybe a little ham too to make a breakfast pita. :)

Pictured: Sarafina making Bosnian burek with eggs and urda. It was so fascinating to watch her make the filo-dough by hand. Such hard work, the dough so thin and delicate. Amazing!

Leeks or Cabbage & Urda

Sweet versions (like strudel):

Pumpkin, seasoned with sugar and cinnamon
Apple, chop fine and cook with a little lemon, sugar and cinnamon
Cherry or Raspberry (or any berry, really), cook with sugar and small amount of water and corn starch to thicken

The versions called "burek" and "pita" here in Macedonia are a bit different than in other places. In Bosnia and Kosovo they're still referred to as burek, but they are generally not done in the huge round pans. They're simply rolled into tight oblong pinwheels and baked on a flat baking pan. Here's a link to Wikepedia that has a great little article on all things Burek as related to it's Turkish roots and different variations found here in the Balkans.

Americanized Version: I'm tempted to try making a "meat pie" using a thin pizza dough to roll the ingredients into rather than filo-dough to get more of a bready version. What do you think? Worth a go?

Tuesday, August 12, 2008

Recipe: Homemade Chunky Salsa

Being a true California-girl I adore Mexican food, but since there's not much here I've had to learn to make things from scratch like tortillas, guacamole and salsa. And since I mentioned "salsa ingredients" yesterday, I thought it would be fun to share my personal Balkan-adapted recipe for homemade chunky salsa.

Carolyn's Balkanite Salsa

Proportions are general, flexible and a guesstimate of what I actually use. Basically I throw stuff in that I think will be good and adjust quantities for flavor and heat. :)

3 large, ripe tomatoes, finely diced
2 med, hot onions, finely diced
1 large, sweet onion
3 med sweet peppers (long and skinny are the type we get here instead of bell peppers. see pic)
1 hot pepper, finely diced or,
3 T jalapenos, finely diced & crushed
2 cloves garlic, minced
Juice of 1 lime and 1 lemon
2 T cilantro
Salt & pepper to taste

Chop tomatoes, onions and peppers as fine or as chunky as you prefer. Or, if you like, you can do what I do and chop them into chunks and place into a spin-chopper (pictured above). When mixed well to preferred blend or chunkiness, add minced onions, lime and lemon juice, cilantro and hot peppers (or jalapenos). Important: add hot peppers a little bit at a time to control level of heat and to not end up with salsa so spicy that it could rival Thai-food.

Taste test (it's just a good excuse to dip a tortilla chip to test the combined flavor.) You may need to test it a few times just to be sure. ;)

Add salt and pepper to taste. Taste test again with the helpful hand of another tortilla chip and adjust ingredients if necessary. If the salsa is a little hot, you can always add a sugar cube, a little more lemon and a little tomato juice (or paste) to help offset. Otherwise, be prepared to drink a lot of milk (water only makes it hotter). Or, if you're allergic to milk like I am, the only recourse is to go to a mirror and watch the steam escape from your ears and pray the tingling sensation in your lips goes away and your taste buds recover. ;)

Place in air-tight container and chill for at least 2 hours for best first-use flavor. Enjoy!

Alternative Preparations:

Option #1: Roast all vegetables on a grill (including garlic) before blending together in the spin-chopper. This adds a different dimension to the flavor and is especially nice on fajitas or Spanish omelet.

Option #2 (pictured): Finely chop 2 tomatoes, 2 hot onions, 2 sweet peppers, 1 hot pepper (or 1 T jalapenos), 1 garlic clove, lemon juice and a dash of salt. Add all ingredients to a skillet. Bring to boil, reduce heat and simmer for 1/2 hour. Finely chop remaining fresh tomato, onion, pepper (sweet and hot) and garlic. Combine fresh items with the stewed portion in large airtight container with lime juice. Add cilantro, salt and pepper to taste. Chill at least 2 hours before use for full flavor.

Option #3: substitute 1 cup stewed tomatoes and 1/2 cup tomato juice for fresh tomatoes. I use this option usually in the winter when fresh tomatoes are in short supply.

*******

As you can see, ingredients are adapted to what's available here and items you can't get here (like jalapenos) were wonderful gifts from friends. :) Fresh cilantro, a must-have ingredient for salsa, is something that has only recently shown up in the produce section of Ramstore (local supermarket) in the last year. Sadly, they were out when I made this recipe, but thanks to the generosity of a friend in the US I had that big bottle available.

Many thanks to those who sent care packages with the above specialty items as well as for the many packets of taco seasoning. They will come in quite handy for my next girl's night out: "Taco Night." At the last one I had the salsa was a big hit--some gals just chose to fore-go the tortilla chips and to just eat the salsa straight! :) As I have a couple jars of jalapenos now, I'm thinking of trying my hand at a green salsa as well for the party. (I've tried making it with the local hot peppers, but it's just not the same.) My brother showed me a quick recipe he learned when he was in Mexico last year, but if you know any recipe's I'd love to hear them! It's always fun sharing these different things with my Macedonian friends--especially since many love spicy food! Though I suppose I should offer some milder options too. :)

Monday, August 11, 2008

Recipe: Breakfast Bundt Cake

This weekend I made a type of bundt-cake that I first watched a Macedonian lady prepare for Alpha several years ago. She wrote the recipe on the back of an envelope for me and it's since become one of my favorites.

It's name, Куглов, refers to the pie pan (a bundt) more than it does to the type of cake. As this particular recipe includes breakfast items like ham and eggs, I've decided to give it the English name: Breakfast Bundt Cake. I like this recipe a lot because the cake can be cut into individual servings for breakfast-on-the-go. I hope you enjoy it as much as I do!


Breakfast Bundt Cake

5 Eggs
15-20 T Flour
25g Ham, finely diced
25g Feta, finely chopped (use a plain, crumbly, cheese like Greek Feta but with low sodium)
3-4 Carrots, finely diced
1-1/4 T Baking powder
1 T Parsley

Mix eggs with blender until smooth. Add baking powder and mix well. Add the flour evenly and until the consistency is a bit thicker than cake-batter. Add ham, cheese, carrots and parsley. Blend well. Batter should be chunky and slightly sticky. Put into a lightly greased and floured bundt pan and bake for 20-25 minutes at 292F. Remove and place on wire rack to cool. Enjoy!

*******

Carolyn's California-girl-who-misses-Mexican-food variation: Substitute salsa ingredients, cheese, cilantro and a bit of jalapeno for the ham, feta, carrots and parsley.

Friday, January 25, 2008

Recipe: Shopska Salad

Every country has their own specialty food items that stand out above the rest. One of my favorites here in the Balkans is the "Shopska Salad."

Here's the basic recipe:

1 cucumber, diced (use English or Hothouse cucumbers for best flavor)
1 tomato, diced
shredded feta cheese
dash of salt
oil

Dice the cucumber and tomatos. Sprinkle with salt and oil. Mix well. [Some local friends insist that you should mix with your hands, convinced that it makes it taste better because it insures thorough blending. Personally, I use a fork.] Shred the feta cheese on top of the salad. Use as much or as little feta as you like. Optional additions include: diced onions and/or diced hot or sweet green pepers.

Prijetno! (Enjoy!)

When I'm showing visitors/friends from the US around town, one guaranteed stop is at a small restaurant in the old city appropriately named, "Turist Restaurant." This place has one of the best presentations of this local favorite. (Pictured) When people first find out that it's made with feta cheese, eyebrows do shoot up and quizical/doubtful expressions appear; however, most people are converted to shopska-lovers pretty quickly.

The mix of flavors in this salad is amazing. I'm convinced that it's because the veggies are fresh and ripe and the feta, locally made, far-surpasses any feta you can get in the US. Sitting in a garden courtyard cafe next to a fountain probably has something to do with it too. Ambiance and all. ;)

Monday, September 24, 2007

Equinox in the Balkans

I didn't look at my calendar yesterday, but walking home after church I just knew it had to be the first day of Fall. The scorching heat of the summer was gone and a slight chill accented the warm morning air, but that's not how I knew. At first it was only a hint of it in the air, but then a light breeze picked up and there it was! The smokey sweet smell of roasting peppers.

From now until about mid-October this smell will dominate your senses here in the Balkans as people roast peppers for making a local specialty called "Ivar." (aka in Cyrillic letters "AJBEP.") This is a type of pepper-relish that is great on bread with feta cheese. Though it can be an aquired taste, it's a whole lot of cultural fun to make.

Two years ago I was able to go out to a nearby village with a couple from church and make it. Boy was it hard work! Yes, it's just washing, roasting, peeling and coring, but when you're working with 50 kilos (about 110lbs) of peppers it adds up! The time spent with Macedonians making it, though, is pricesless.

If you're feeling adventurous, here's a simple recipe to make your own Ivar: (ingredients and amounts can vary here by region)
3 kilos red sweet peppers (pictured above)
2-3 small hot peppers to spice it up for flavor (optional... add too many and it's called "lutenitsa"... or hot sauce rather than ivar)
1 small eggplant
Oil
Salt to taste

Wash and core peppers (some Macedonians will actually peel and core after roasting, but trust me, it's SO much easier to core first to get rid of all the seeds rather than later).

Grill the peppers and eggplant over wood (best for the smokey flavor) until skin is crispy
As each batch is done, place peppers and the eggplant in a plastic bag to "sweat"

Peel the peppers, cut lenthwise and place them in a bowl or on a plate

Peel the eggplant

Grind the peppers and eggplant together and put in large soup pot

Add about 1tsp salt to start and 1/3 cup oil (personally, I like to use as little as possible, while locally, they'd use a bit more)
Cook over low/med heat for several hours, stirring with a wooden spoon.

Put some fresh warm Ivar on some bread and enjoy! Jar and store the remainder. This batch should make about 2 large Majonaise-jars full.

Footnote:

You know, the smell of roasting peppers in the air is just one of the ways to tell that it's the first day of Fall. Other indicators include all the ice cream freezers at the markets will be locked shut (likewise, the harborer of the first day of spring is that they'll all be opened that day) as well as the chestnuts beginning to fall from the trees. Roasting the chestnuts, however, is an indicater of winter, and we're not there yet! ;)

Monday, April 2, 2007

How to Ruin Chocolate Chip Cookies

The precious bag of chocolate chips was extracted from the freezer and 1/2 can of precious Macedamian nuts were chopped up... all in preparation for making chocolate chip cookies to bring to the cell group on Monday night.

The first thing to go wrong was when I tried to cream the butter, vanilla and eggs. They were lumpy, runny and just wouldn't fluff-up. Then I realized that I'd forgotten to add the sugar. Once that was done it creamed up quite nicely.

With step one done, in a separate bowl I mixed the salt, 1-1/4 cup flour and baking soda and then added the whole mixture to the creamed ingredients. The end result was a tiny bit sticky, but I've had cookie dough do that before so I didn't think anything of it and went ahead and added the precious chocolate chips and macadamia nuts (given to me by a Chinese Alliance church when I was on Oahu).

Then I got inventive. I thought to myself, "Oh, why don't I put the cookies in a muffin pan? That'll be fun." Only, the end result was not what I'd planned and was a pure mess to clean up. Also, because I'd done that as the first batch, I'd not noticed that something was wrong until the second batch was in on a regular cookie sheet.

The cookies were MELTING! It was a gooey icky looking mess! Oh what did I do wrong? They actually reminded me of the way my cookies looked when I first moved overseas and could only find vanilla sugar (it's near impossible to find vanilla extract here). Anyways, to compensate I had to add more flour.... FLOUR! It was then it hit me! I'd only used 1-1/4 cups flour instead of TWO and 1/4 cups flour!

Well, it was too late to save the cookies that were already in the oven, but the last 1/2 of the batch was still salvageable. So I proceeded to add the missing cup of flour. But it wasn't until I'd mixed it up that realized that I'd forgotten to compensate for the batter that had already been used up. Too late now. I went ahead and baked up what was left... the result? Tough cookies with a heavier flour taste and not quite the beloved chocolate macadamia nut cookie taste.

But that's not all. While the last batch was in the oven, I got busy with the laundry: sorting, loading, and hanging out the previous load to dry. Well, then I decided to mop the balcony floor.... mid-swish a whiff of chocolate chip cookie wafted my way....

OH NO! I dropped the mop and rushed to the oven.... and pulled out 7 very BROWN and TOUGH chocolate macadamia nut cookies. Well, I'm not going to let them go to waste (chocolate chips are precious here because you can't get them locally... people send them from the US). Anyways, I've packed up all the cookies and will still bring them to the cell group. They're not perfect, but they'll still taste ok. (I hope.)

So there you go. A lesson in how to ruin chocolate chip cookies. Now, go and DON'T do likewise.

Master-chef (not)
Carolyn